CNC – Module 2.6
Module 1 | Module 2 | Module 3
Module 2.1 | Module 2.2 | Module 2.3 | Module 2.4 | Module 2.5 | Module 2.6 | Module 2.7
Run Your NC Program
Before actually running your program on the machine you should first test it using the graphic simulator.
 1. Enter the MEM mode using the Mode keypad. |
 2. Press the SETNG GRAPH button twice to display the graphic simulation screen. |
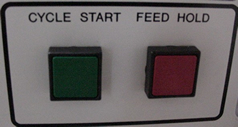 3. Now, you can push the CYCLE START button to start the simulation. (If there are any errors in your code, they will come up during the simulation.) The graphics simulator will just tell you if you have any errors in your code, but it will NOT tell you if you set your work or tool offsets incorrectly. Therefore, you might still crash a tool, etc.) |
 4. After you have resolved all your errors in the graphics simulator, and all other steps are complete, you should be ready to run. Enter the MEM mode and push CURRENT COMMANDS. |
 |
 |
| 5. Okay, you should be all ready to cut some metal! Push Cycle Start and your program will run. If you set single block on, you will need to repeatedly push Cycle Start after each line is run. Remember from before that it is a really good idea to keep on finger near the FEED HOLD button while testing a program, so you’ll have a chance to react to any problems.If there are any errors in your program, and alarm message will appear and the program will stop. You can view the error message and then go to the EDIT mode to make changes. We will not cover the numerous problems you might encounter. Refer to the user manual or your NC text, or your instructor for help. |
 |